Creality Ender 3
- Octoprint backup archive
- Ultimaker Cura configuration
- Print profiles
- Filament set up
- Raspberry Pi 4 / Octoprint case
- Marlin custom firmware
- 3D printer custom parts
Octoprint backup archive
[2024-02-08] Ender3-backup-20240208-205005.zip
Ultimaker Cura configuration
Cura Printer configuration
| Printer | Extruder |
|---|---|
 |
 |
Start G-code
; Octoprint's Octolapse plugin required G-code
; Script based on an original created by tjjfvi (https://github.com/tjjfvi)
; An up-to-date version of the tjjfvi's original script can be found
; here:  https://csi.t6.fyi/
; Note - This script will only work in Cura V4.2 and above!
; --- Global Settings
; layer_height = {layer_height}
; smooth_spiralized_contours = {smooth_spiralized_contours}
; magic_mesh_surface_mode = {magic_mesh_surface_mode}
; machine_extruder_count = {machine_extruder_count}
; --- Single Extruder Settings
; speed_z_hop = {speed_z_hop}
; retraction_amount = {retraction_amount}
; retraction_hop = {retraction_hop}
; retraction_hop_enabled = {retraction_hop_enabled}
; retraction_enable = {retraction_enable}
; retraction_speed = {retraction_speed}
; retraction_retract_speed = {retraction_retract_speed}
; retraction_prime_speed = {retraction_prime_speed}
; speed_travel = {speed_travel}

; Ender 3 Custom Start G-code
G92 E0 ; Reset Extruder
G28 ; Home all axes
G1 Z2.0 F3000 ; Move Z Axis up little to prevent scratching of Heat Bed
G1 X0.1 Y20 Z0.3 F5000.0 ; Move to start position
G1 X0.1 Y200.0 Z0.3 F1500.0 E15 ; Draw the first line
G1 X0.4 Y200.0 Z0.3 F5000.0 ; Move to side a little
G1 X0.4 Y20 Z0.3 F1500.0 E30 ; Draw the second line
G92 E0 ; Reset Extruder
G1 Z2.0 F3000 ; Move Z Axis up little to prevent scratching of Heat Bed
G1 X5 Y20 Z0.3 F5000.0 ; Move over to prevent blob squish
End G-code
G91 ;Relative positioning
G1 E-2 F2700 ;Retract a bit
G1 E-2 Z0.2 F2400 ;Retract and raise Z
G1 X5 Y5 F3000 ;Wipe out
G1 Z10 ;Raise Z more
G90 ;Absolute positioning

G1 X0 Y{machine_depth} ;Present print
M106 S0 ;Turn-off fan
M104 S0 ;Turn-off hotend
M140 S0 ;Turn-off bed

M84 X Y E ;Disable all steppers but Z
Print profiles
Filament set up
PLA
| Brand | Filament desc | Printing temp | Build Plate temp | Retractation Distance |
|---|---|---|---|---|
| Geeetech | Black | 210°C | 60°C | 0.75mm |
| Geeetech | Silk Silver | 210°C | 60°C | 0.75mm |
PETG
| Brand | Filament desc | Printing temp | Build Plate temp | Retractation Distance |
|---|---|---|---|---|
| Geeetech | -- | -- | -- | -- |
Raspberry Pi 4 / Octoprint case
Final result :
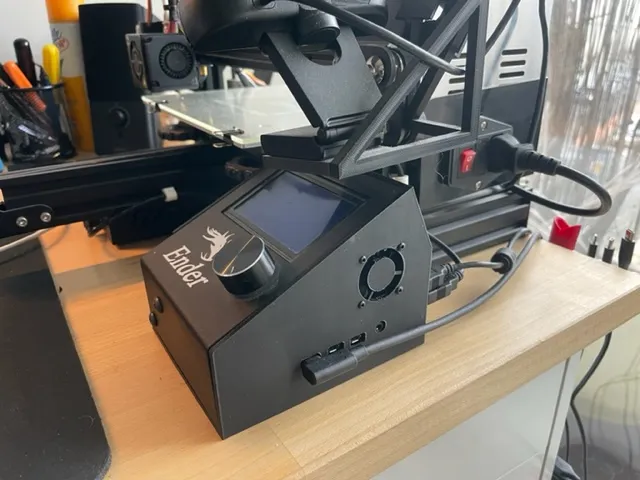
3D model for case printing
Activate button and led support
Full tutorial
Raspberry Pi Power-Up and Shutdown with a Physical Button
TL;DR
Add button support
- Edit
/boot/config.txtfile. - Add line
dtoverlay=gpio-shutdown.
Final result:
[...]

[all]
# enable raspicam
start_x=1
gpu_mem=128

# Simple button on/off
dtoverlay=gpio-shutdown
Add LED support
- Edit crontab
#> crontab -e
- Add the line
@reboot raspi-gpio set 4 op dh
Final result:
# Edit this file to introduce tasks to be run by cron.
#
# Each task to run has to be defined through a single line
# indicating with different fields when the task will be run
# and what command to run for the task
#
# To define the time you can provide concrete values for
# minute (m), hour (h), day of month (dom), month (mon),
# and day of week (dow) or use '*' in these fields (for 'any').
#
# Notice that tasks will be started based on the cron's system
# daemon's notion of time and timezones.
#
# Output of the crontab jobs (including errors) is sent through
# email to the user the crontab file belongs to (unless redirected).
#
# For example, you can run a backup of all your user accounts
# at 5 a.m every week with:
# 0 5 * * 1 tar -zcf /var/backups/home.tgz /home/
#
# For more information see the manual pages of crontab(5) and cron(8)
#
# m h  dom mon dow   command
@reboot raspi-gpio set 4 op dh
Marlin custom firmware
Installed firmware
- Currently used tag:
2.1.2.4 - Details: Firmware sources and custom configuration (local repo)
- Last compilation date:
2024-10-10 @ 09:53
Useful resources
Firmware configuration:
- Marlin 2.0.x Firmware Guide for BTT SKR Mini E3 v2.0 Ender 3
- Marlin 2.0.8 guide - PID autotune
- Marlin 2.0.8 guide - Bed Leveling - BLTouch, Inductive Sensor
Theorical documentation:
- [MARLIN] Déterminer les dimensions / positions de la zone d'impression de son imprimante (cartésienne / CoreXY)
- comprendre la zone de palpage avec un ABL afin de paramétrer son Marlin
Printer calibration:
Proceed with the different calibrations in the above order:
- Marlin PID Auto-Tune - A Complete Guide
- :warn: First do the PID Auto-Tune for the bed. Else you may have false positive thermal runout.
- Z-Offset Wizard – A Complete Guide
- Linear Advance: